Showing posts with label House & Home. Show all posts

Wednesday, January 24, 2018

How to Make an Easy Winter Wreath


I decided I wanted to try making a wreath, so I looked around on Pinterest until I found some ideas - something that would be easy to do - and I found an idea for a very easy and inexpensive Winter wreath. I'm not a super crafty person but, seriously, anyone can do this! It is so simple.

What you need:
  1. A round wreath base. I found a wooden vine type of wreath at The Dollar Tree for $1.00.
  2. A long winter scarf. I found a nice one at a resale shop for 25 cents.
  3. Winter-themed buttons or felt decorations. I found a small bag of plastic snowflakes in the craft section at Walmart for less than $2.00. 
  4. A hot glue gun and hot glue (which I already had).

Wrap the scarf evenly around the wreath base and tie it in a knot at the bottom (In some cases, you might find it easier to cut the scarf in half lengthwise before wrapping, so you end up with enough material to cover the base). Then, hot glue the decorations around it.

Hang it up and enjoy!


Sunday, October 29, 2017

Easy Slow Cooker Baked Apples


With an abundance of apples this time of year, how do you like to use them up? In the past, I have made apple cobblers, dutch apple pies, spice apple cake, and homemade applesauce. But, so far this year, I have only made these yummy baked apples in the slow cooker. My mom used to make her version of  "baked apples" in a saucepan on top of the stove. This slow cooker version is very similar to those, and they give a nice smell to the house while they are cooking. They are also great to take along to potlucks and family gatherings and - for those who are gluten free, or those who are watching their sugar intake - they are a healthier option than pies and cobblers. You can also do the same thing with an overabundance of pears.  

For a 4 quart slow cooker, you will need at least 6-8 large apples, or double that if they are small. Peel and slice the apples and place into the slow cooker.

You will want enough apples to almost fill the slow cooker.

Mix together 3 TB of melted butter, 2 TB of lemon juice, 1 tsp of cinnamon, and 3 TB of brown sugar or honey.

Pour the mixture over the apples and gently stir to evenly coat the apples. You have the option of also sprinkling 2 more TB of brown sugar on top if that is what you are using. Cover them and cook on low for 4 hours, high for 2 hours. Stir and enjoy!

I forgot to get a photo of the finished apples while in the slow cooker, but here is a look at some of the leftovers. Everyone in my family loves these, except for my son. He doesn't like the "mushy" texture, as he puts it, and prefers raw, crunchy apples; but to each their own.

The recipe is below if you want to make this dish for your next church potluck or Fall fellowship. It is always good to meet together with others, especially other Christians, so we can be encouraging one another in our Faith. Unfortunately, living in this world is not getting any easier, but we can lean on each other for strength.

Hebrews 10:25 - Not neglecting to meet together, as is the habit of some, but encouraging one another, and all the more as you see the Day drawing near.  (ESV)


Slow Cooker Baked Apples

My mom used to make her version of "baked apples" in a saucepan on top of the stove. This slow cooker version is very similar to those, and they give a nice smell to the house while they are cooking. They are also great to take along to potlucks and family gatherings and - for those who are gluten free, or those who are watching their sugar intake - they are a healthier option than pies and cobblers. You can also do the same thing with an overabundance of pears.
Ingredients
  • 6-8 Large Apples
  • 3 TB Melted Butter
  • 2 TB Lemon juice concentrate
  • 1 tsp. Ground cinnamon
  • 3 TB Brown Sugar or Honey
Instructions
Peel and slice apples to almost fill a 4-quart slow cooker. Mix butter, lemon juice, cinnamon and brown sugar (or honey), and pour over apples. Stir gently to mix. Cover and cook on low 4 hours or high 2 hours.


Sunday, October 8, 2017

My Simple Fall Decor

I like to decorate my home for the different seasons of the year - but I do it simply. I'm not a "Better Homes & Gardens" type of decorator. I don't have hay bales and pumpkins, scarecrows and corn stalks all over my yard and home. I do love those things, and I love seeing them around town and in other people's homes, but they can sometimes be expensive, and kinda messy too. So, I stick to simple and inexpensive, which works fine for me and my family.

Our dining room table is an antique, at least 100 years old, passed down from David's side of the family. A few years ago, we had it refinished. So, instead of covering it up with a tablecloth, I use a clear plastic cover on it (purchased in the yard goods section at Walmart). Then, for each season or holiday, I am able to put decorations underneath the plastic, along with a table runner on top. For Fall, I found a free printable file on Currclick.com of Christian Fall Decorations.  After downloading the file, I used a color printer and cardstock paper to print out the deigns, and then cut them out. The printable file includes various leaves and pumpkins with Scripture verses on them (See examples below). I love including Scripture in our home decor. It always helps remind us of God's love and care for us.
Example #1
Example #2

For our windows, I found gel stickers of colored leaves at the Dollar Tree. I purchased two sets at $1.00 each, which was just enough for our kitchen/dining room windows. 
For our front door, I found a large colored leaf made of some sort of felt material, and a bell decoration to place in front of it, again at the Dollar Tree. I was going to try to make my own Fall wreath this year but, when I saw these, I decided to save time and money. This works just as well as a Fall wreath and was only $2.00. 


My family and I are not big fans of Halloween. So, these Fall decorations go up at the beginning of September, and stay up through Thanksgiving. I hope you enjoy these simple ideas for Fall decorating, and enjoy the beauty of this cooler-weather season.

Thursday, October 22, 2015

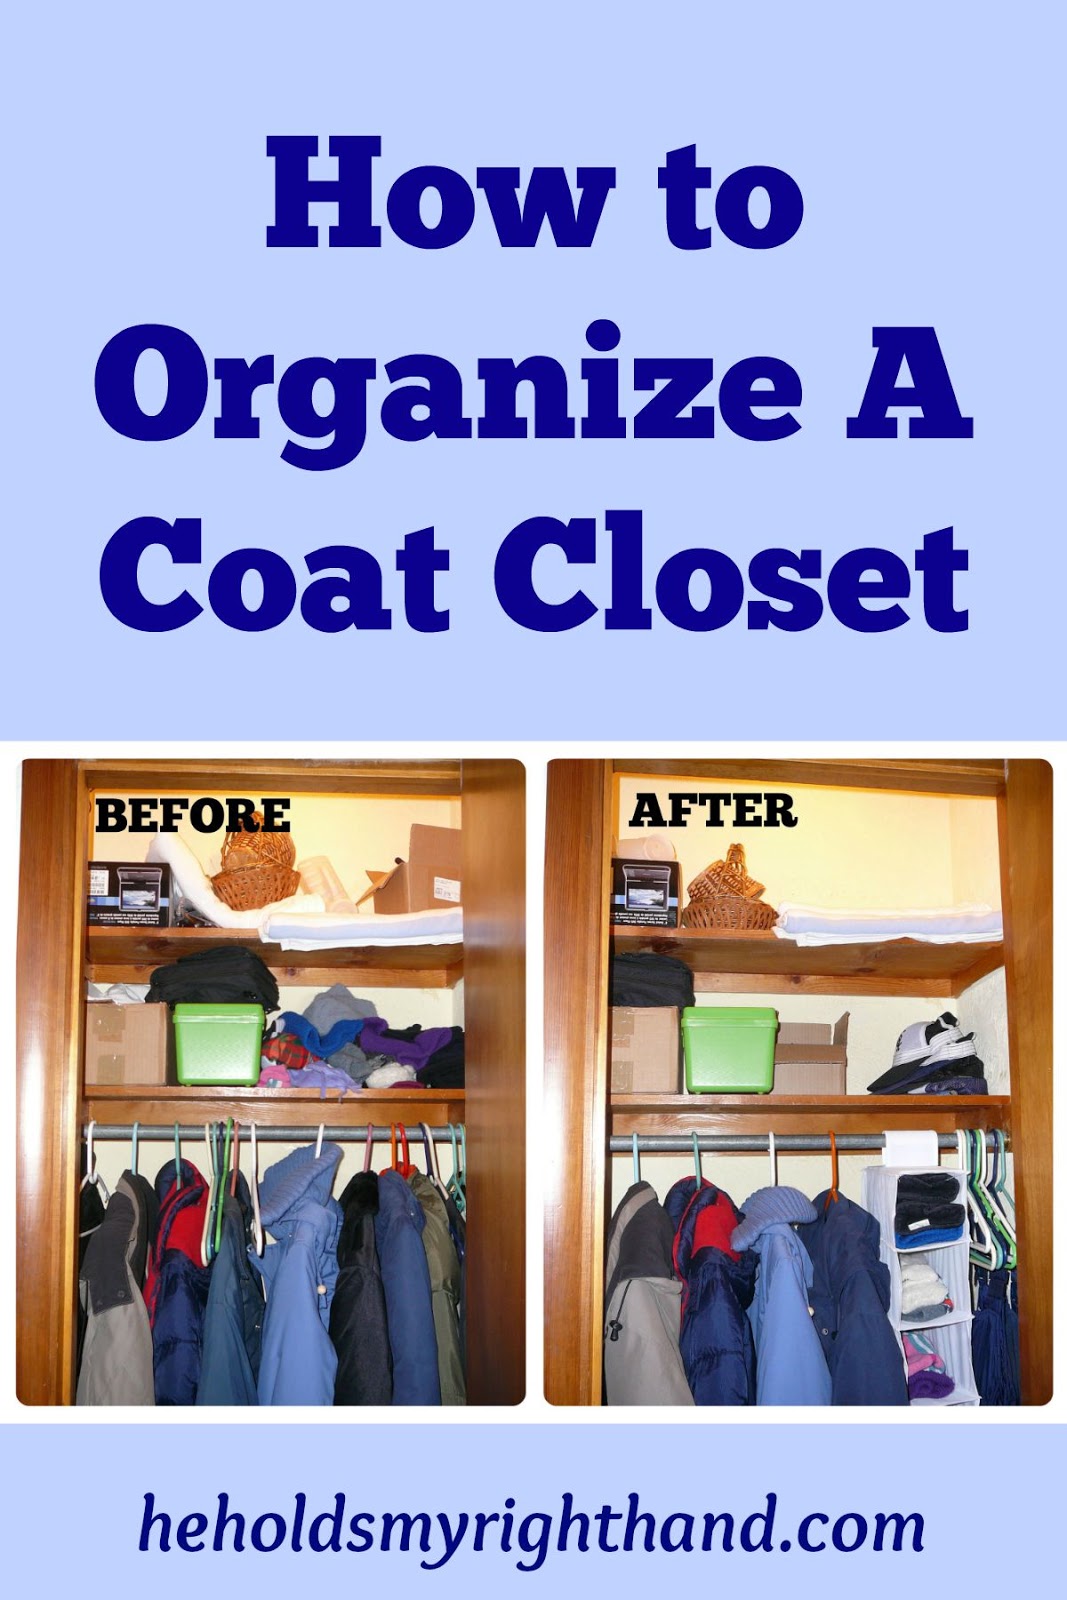
How to Organize A Coat Closet

Last year, I took a look in our "in-season" coat closet and noticed it needed some help. (We have two separate coat closets–one in a storage room that stores the out-of-season items, and an in-season closet near the front door). At the bottom of the closet, there were balls and Frisbees, mixed in with tote bags and many other items that didn’t really have a set place; one shelf at the top held hats, gloves and scarves that were piled up into a mixed-up mess; the second shelf held a number of different items that were crammed together; and, all of the jackets and coats were mixed together in a way that made it hard to pull one out without dragging 2 more along with it.  I knew it was time for an organizing job.

The first thing I did was buy an inexpensive 10-shelf shoe organizer at a discount store. Somewhere, I had seen the idea of using a shoe organizer for things like hats, gloves, mittens and scarves. So, I bought an organizer and hung it up in the closet; then, proceeded with the following steps:

1.  I removed all the hangers, coats and jackets that were not needed for the winter season, and set them aside to be taken to the storage room. At the same time, I went through the coats that had been outgrown and put them into a pile to give away.

2.  All of the coats left in the closet were hung into one direction. It may not seem like a big deal to do this, but it ends up looking so much nicer this way. For someone who enjoys seeing things neat and tidy and having everything in an easy-to-find manner, it is truly satisfying to see the end result. Just try it and you’ll see what I mean.

3.  Everything that had been thrown onto the bottom of the closet was removed and sorted. Once again, I decluttered where necessary, placing unwanted items into bags or boxes to give away (or sell). At the same time, I added a storage container to store the items we decided to keep. For us, these are things like balls, Frisbees, and tote bags. Now, instead of searching for a missing item on the floor of a dark, messy closet, we can pull out the storage container and rummage through that instead. Another option:  If you don’t have one of the shoe organizers I mentioned previously, you could keep all of your hats, mittens and scarves in a container like this:
4.  Next, the top shelves were decluttered by removing unwanted or unneeded items. Then, “like” items were placed with other “like” items, and everything else was tidied up.

5.  This last step is simple, but important... I threw away the trash, and made sure all of the items that did not belong in the closet were put away into their proper place. Be sure not to wait until later for this step, or it may not get done in a timely manner. Do it right away!

After accomplishing all these steps, it was so nice to step back and take a look at the final product. I was very pleased with what I saw and decided I wanted to keep it that way! That is one of the biggest challenges of all, isn’t it? But, at least its a good start! 

Thursday, October 1, 2015

Favorite Reasons To Drink Coffee

Do you drink coffee? If you don't, you are in the minority. Coffee is one of the world's most popular drinks, whether it be hot, cold, bold, mild, flavored, full of caffeine, or decaffeinated. Why is it so popular? What is it about this drink that makes so many love to drink it?

I recently decided to take my own little survey from family and friends to see how many of us drink coffee, and why. I sent out 100 e-mails, and received 45 responses in return. In the e-mail, I asked them to share at least two reasons why they drink coffee (if they do), or share why they don't. Here are the results:

71%   drink coffee, even if only once in awhile (32 out of 45)
29%   do not drink it at all

For those who drink it, here are the main reasons:
56%   drink it for the caffeine / pick-me-up / energy
44%   like the taste
27%   drink it out of habit or routine
20%   drink it for the warmth
19%   enjoy coffee with friends (social drinkers)
13%   love the smell
13%   say it is comforting, gives them good feelings, coziness
6%     drink it for health reasons
3%     say they are addicted to it
3%     say it is a non caloric warm drink
3%     say it is more convenient than other hot drinks

Those who do NOT drink it give these reasons:
69%   Don’t like the taste 
23%   Don’t like the smell
15%   Say its not their preference, have no interest
15%   Say they can't drink it due to health issues
8%     Say it is too addictive and they don't want to get hooked

Personally, I don't remember the exact time when I started drinking coffee on a regular basis. But, I know it wasn't because I wanted the caffeine, since my coffee is usually decaffeinated. There are days when I am dragging and find I need a boost; so, occasionally, I will make coffee with half caffeine and half decaff - a sufficient amount to get me going without giving me the jitters - but it is not the main reason I began drinking it.

I also did not start drinking it for the taste (Although, now, I really do enjoy the taste, especially when it is doctored up with flavored creamers or some milk and flavored Stevia drops.)

As I think back, I realize the biggest reason I STARTED drinking coffee was for the smell (or, the  aroma), as well as it being a comforting beverage for me to start my day with.

What is it I like about the smell?  To answer that, let me ask you another question first:  What memories do you have of your childhood home? If you really think about it, you will notice that many of your favorite childhood memories are based on a smell - fresh bread being baked in the oven, cookies being made, a favorite meal, flowers in the garden, a lilac bush, wet hay, barn smells, the smell of rain, pine needles from a Christmas tree, a pipe or a cigar, maybe some stinky feet, and on and on. Our sense of smell can cause us to remember things from the past - whether they be good or bad smells - and, for me, one of the smells that reminds me of my childhood is a pot of fresh brewed coffee in the morning. I never liked the taste of coffee when I was growing up, and I didn't understand what was so good about it. But, I always saw my parents enjoying it, and I saw them being hospitable when they offered a cup to our guests. (Thanks, Mom and Dad, for letting me see your example of hospitality.)

1 Peter 4:9 - Be hospitable to one another without complaint.

Dad & Mom, 2008
For many years after I left home, I never made coffee unless my parents came for a visit. My husband didn't drink it either (and still doesn't). But, as the years passed, I think I started missing that smell because, one chilly Saturday morning, I decided to make a pot to help warm me up. I found out I enjoyed it, and it quickly became a Saturday morning ritual for me. Then, it eventually expanded to where I am now drinking it at least 4 or 5 times a week. I like the taste, I like the warmth, I like the smell, and I like the cozy feelings it gives me. It is a nice way to start my day. 

What about you? What scent-filled memories do you have from your childhood home? 

What memories are you now making for your own children to look back on one day?

---------------------------

FYI:  According to Wikepedia, and The International Coffee Organization, TODAY (October 1st), is considered the FIRST OFFICIAL INTERNATIONAL COFFEE DAY! It is a day set aside to promote and celebrate coffee as a beverage, with various events now occurring in places across the globe.


Thursday, September 24, 2015

A "Catch All" Area Made Tidy

When we enter our house from the garage door, or the back door, we immediately enter the laundry room. That makes the washing machine and dryer easy targets to be a "catch all" for our jackets and everything else. A few years ago, this is what the laundry room looked like most of the time...


If our jackets didn't get dropped off here, they would make their way to the kitchen table and be placed on the back of a chair. Why? Because... well... it's just too much work to take 5 more steps, open a closet door, and put the jacket on a hanger! Right? (Yes, that is sarcasm.) So, this frustrated momma decided to make a change that would make it easy for all of us to hang up our jackets and help tidy up our laundry area. I went to Walmart and bought 2 identical hook racks. Then, I enlisted the help of my husband to help me attach the racks to the wall. This was the final product...


Do we still use the washer and dryer as a "catch all?" Yes, unfortunately we do. But... at least the jackets usually find their homes hanging on the hooks.

How do YOU deal with "catch all" areas? What solutions have you come up with to help in your home?

Thursday, September 17, 2015

I REMEMBER: 5 Ways We Were Welcomed To Town

How do you welcome newcomers to your town? How do you welcome them to your church?


Seven years ago today, we moved into our current home.

I remember how David needed to come to town at least a month before the kids and I joined him. So, he lived out of a little motel during that time and, on Sundays, he visited the church we are now attending. After we finally got settled into our new home, we realized what a blessing this church had been to us and decided to attend there on a regular basis.

Let me share with you 5 big ways this church showed the love of Jesus and welcomed us to town: 

1.  On the day we moved in, some of the members of the church brought lunch over for our family and the movers who were unloading the truck. We had a simple meal of BBQ porkburgers on buns, as well as a couple side dishes. They grilled the burgers beforehand, and brought them over in a slow cooker to keep them warm. It was very helpful, and very much appreciated.

2. After lunch, one couple stayed a little longer to help us get the beds set up. We've always been told the beds are the first things you want to get set up when you move in. That way, the beds are there when you are tired from unpacking and ready for sleep.

3.  Later that afternoon, one of the men from the church came over and mowed our lawn for us with his riding mower. The grass was getting long and all we had at the time was a push mower. Since we have 1 acre of land to mow, using a push mower would have taken forever! So, mowing the lawn for us was a very helpful gesture.

4.  That night, we went over to Hardee's for supper. While there, we met up with yet another couple from the church. We chatted with them a bit, then went up to place our order. As I was getting ready to get money out of my purse, the man leaned in and tossed a $50.00 bill on the counter and paid for our order! It was a nice and welcomed surprise.

5.  When we attended church the following Sunday, they were friendly and welcoming to all of us. I have been in churches that are "cold as ice" when it comes to meeting them the first time. But, most of the people in this church had smiles, handshakes, and a friendly attitude that said "Welcome! We're glad you're here!"  It truly makes a difference.

We were blown away by how helpful, friendly, and generous these people had been, and are very grateful for how they went out of their way to welcome us to town, and to their church.

YOU can be a big encouragement to newcomers in your neighborhood by doing one or all of these welcoming suggestions:

1.  Help them unload the moving truck.
2.  Help them set up their beds.
3.  Help them clean the cupboards before putting dishes away. 
4.  keep an eye on their pets or their children, if they have any.
5.  Provide a meal.
6.  Mow their lawn.
7.  Invite them to church.
8.  Welcome them to your church and show them around.
9.  Give them a welcome basket full of gift certificates and coupons to local businesses.
10.  Get to know them by inviting them over for a meal, or for coffee and dessert.


Thursday, August 20, 2015

How to Condense Your Media Cabinet


My family has a good sized amount of DVD’s, CD’s, VHS, and cassette tapes that, unless they are condensed once in awhile, they would invade our entire household. If you understand what I’m saying, but need some pointers on how to clean out your media cabinet, and would also like some ideas on what to do with the media you no longer want, then this article is for you!

First of all, open your cabinet, or box, or tower, or whatever you use to store media in. Go through each item one at a time and decide if it is something you would like to keep. Ask yourself, and your family members, questions like:

  • How long has it been since we last watched (or listened to) this?
  • Will we ever watch it again?
  • Does it have sentimental value to any of us?
  • Would one of us miss it if it wasn’t here? 
Make a pile of media you no longer wish to keep. Then, determine what you would like to do with them. If you have no idea what to do with them, here are a few ideas:

  • Give them away to family or friends. My parents do this quite often. Instead of renting a movie from a video store, they like to find DVD’s sold inexpensively at garage sales, resale shops, and discount stores. After watching the movie, they go through the questions above and either keep them, or pass them along.
  • To give them away creatively, find a large popcorn bowl and load it up with several movies, bags of microwave popcorn, and bags or boxes of candy. Give it to a family for “movie night.”
  • Sell them. This is a good way to earn a little extra cash. If you have the space to store your unwanted items for a garage sale, then that is a good option. If you would rather not wait for garage sale season, or you don’t have the space to store them, take them to a local consignment shop where you can earn a portion of the sales. Another option is to sell them online. There are various places you can sell used media, as long as it is in good, working condition (such as E-bay, Half.com, and Amazon.com).
  • List them on an online “swap” board. There are a few different swap groups to choose from. Two that I have personally used are swapadvd.com, and swapacd.com, which are both free to join. I have passed along many DVD’s and CD’s through these sites, while earning points to choose items from someone else’s list. It can be a fun, and rewarding experience.  
The last thing to remember is, as new media comes in (via sales, giveaways, and gifts from others), remain consistent with going through them at least every 6 months to decide which ones should find a new home.  


Follow my blog with Bloglovin

Friday, July 31, 2015

We Have A New Front Door

On Wednesday, a small, yet BIG improvement came to our house. We had the front door replaced, and this new door really brightens things up! Take a look at these before and after pictures to see the huge color difference in the entryway...

BEFORE

AFTER

Ephesians 5:8 - for you were formerly darkness, but now you are Light in the Lord; walk as children of Light.

Thursday, July 23, 2015

How to Declutter One Section at a Time

My great-grandmother and her daughter were perfect examples of how NOT to declutter a house (see the picture on the right). Granted, they lived through The Great Depression and learned the importance of saving and re-using anything and everything they could. However, their frugality went a bit too far when they refused to throw away hundreds of empty Cool Whip containers, bags of empty Pringles cans, thousands of newspapers, and just about anything else you can think of. Eventually, it all overtook their home and, when we went to visit, we could only use one narrow walkway to pass through from the living room into the kitchen; and seating space was also very limited. Of course, not everyone goes to this extreme when saving items they “might need later.” But, it seems, the older we get, the harder it becomes to part with certain things, and the less energy we have to do it. So, in order to keep my house from becoming like Great-Grandma's, I have made a point to declutter on a regular basis. Let me share a few suggestions that have helped me in the decluttering process.

First of all, do NOT focus on the whole picture of a decluttered and organized home, or you could become overwhelmed and discouraged with the task ahead of you. Instead, focus on one room at a time; and even just one section at a time. To tackle a bedroom, you can start with a closet, a dresser drawer, a desk, or under the bed. To tackle a kitchen, do one cabinet or drawer at a time. In a play room, clean out the toys. In a living room, clean under, behind, and on top of the couches. Continue moving through each section of the house until the decluttering is complete in your entire home. It could take weeks, or months, or even years to get your house to where you want it. Actually, it's an ongoing process, and you will never completely be done, but starting somewhere is the key.

As you begin each section, gather 3 or 4 boxes, bags, or baskets and set them nearby. Use one box/bag for items to throw away, one box for give-away, one for items to keep, and an optional box for items to sell. Completely remove everything from the closet, drawer or cabinet. Then, choose one item from the pile, take a look at it, and decide where it should go. To help you make a choice, you can ask the following questions:
  • Is this a piece of trash? If yes, then it goes into the trash box.
  • Is this item smelly and/or growing mold? If yes, then trash it.
  • Is this broken beyond repair? If yes, trash it.
  • Can the broken item be inexpensively fixed? If yes, will you (or someone you know), take the time to fix it in a reasonable amount of time? If yes, place it into the “keep” box. If not, trash it.
  • Is this item sentimental to me? If yes, keep it for now. If not, give it away. (NOTE:  Something to remember here is that, no matter how sentimental, you cannot and should not keep everything. This leads to too much clutter. One idea my sister-in-law gave is to take a picture of those special T-shirts you used to wear, or of some special knickknacks you no longer have room for on the shelf. Then, put the photos in an album to look at, and pass along your items for someone else to enjoy, or recycle them if they are no longer usable.)
  •  Is this item something I can and will eventually use? If yes, keep it. If not, give it away.
  •  If you originally set the item aside to “eventually” use, how long have you had it? If it has been more than 5 years, consider getting rid of it.
  • Is this a clothing item that I am still wearing, and is it in good condition? If yes, keep it. 
  • Is this a clothing item that I have not worn for 2 years or more? Then, give it away (unless it is something truly sentimental, such as a wedding dress. Just remember not to go overboard with keeping those sentimental items).
After the piles have been filtered, immediately throw away the trash. Then, everything that is in the “keep” box needs to be put into its proper place. Toys go into toy boxes; shoes lined up and organized; books on bookshelves; and knickknacks on display shelves. Basically, all “like” items should be neatly organized with other “like” items and placed back into a clean closet, drawer, or cabinet.

If you find the decluttering process is too much for you to do on your own, ask a friend for help. Decluttering brings so many great advantages that you won’t want to miss out on.
  1. The satisfaction you feel as you look at the freshly decluttered and organized sections of your home.
  2. The blessing to be able to find the things you need when you need them.
  3. The ability to walk through your home without stepping on things.
  4. The fun of earning some extra cash if you decide to have a rummage sale.
  5. The joy in blessing others with the items you decide to give away.
So, start tomorrow.... and have FUN with decluttering!

Wednesday, August 20, 2014

Our New Rock Garden

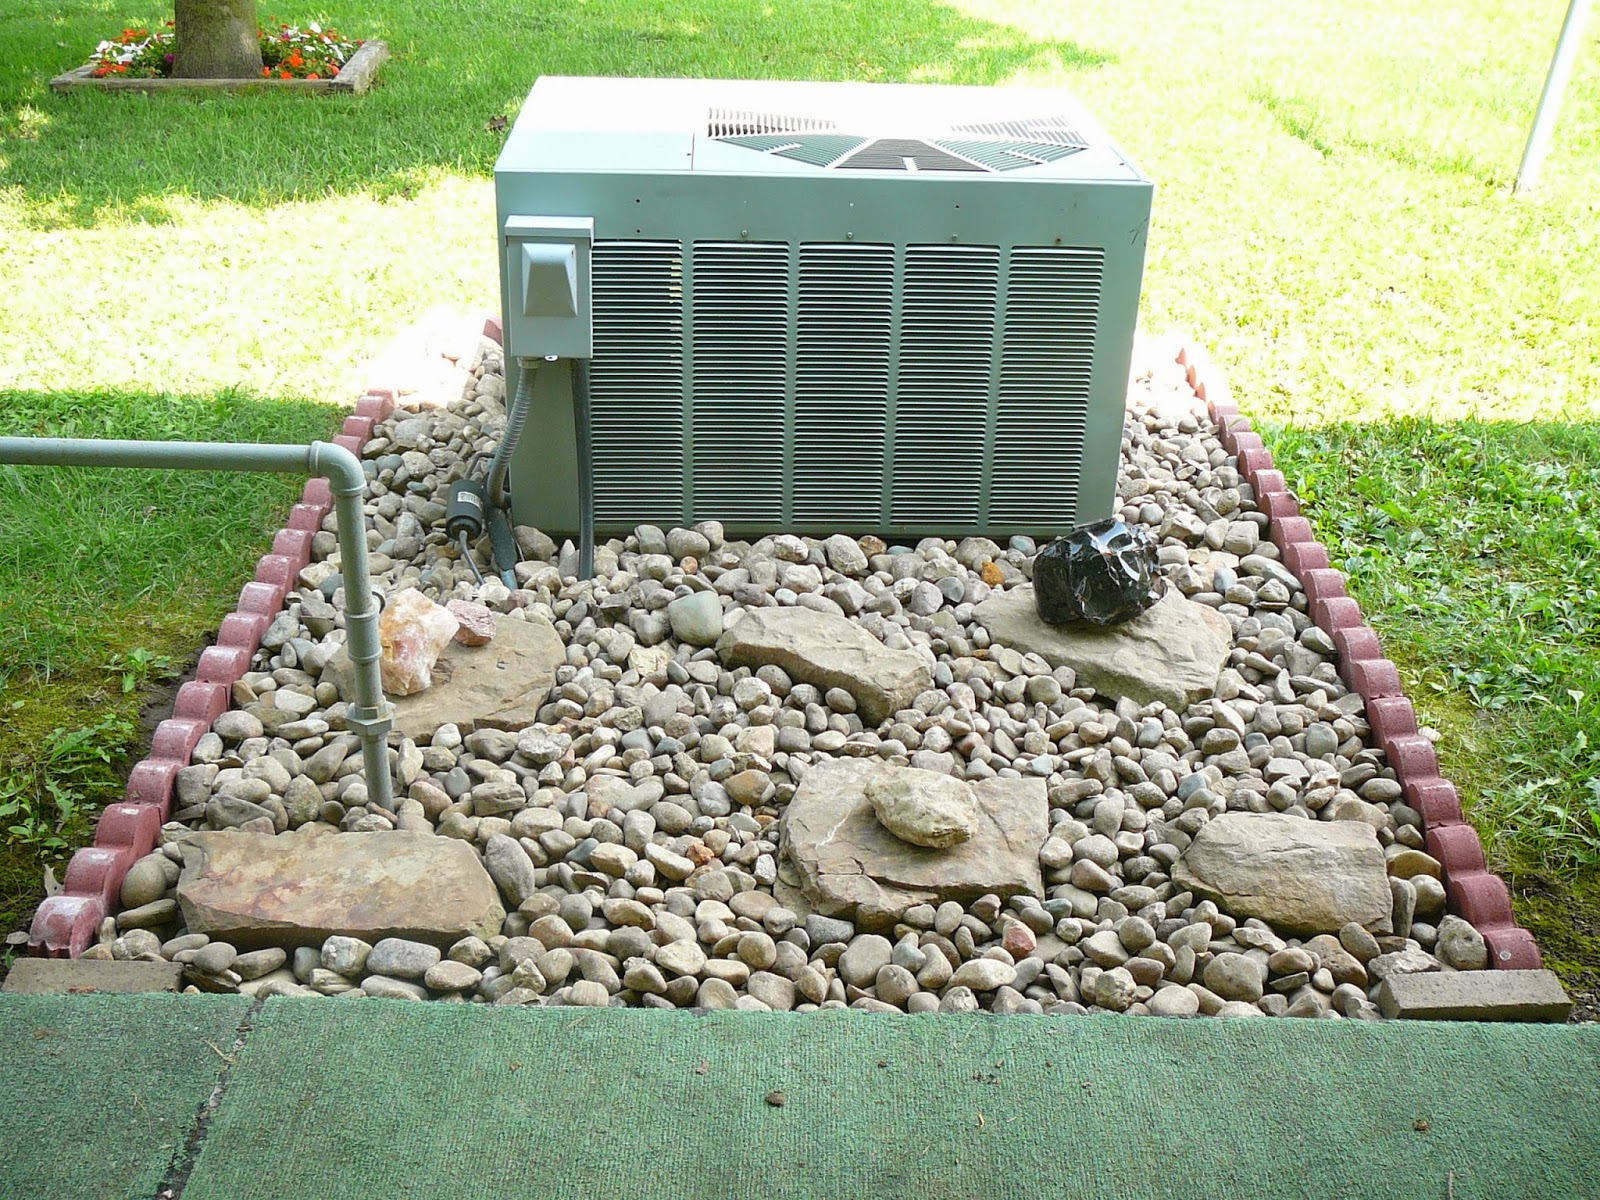
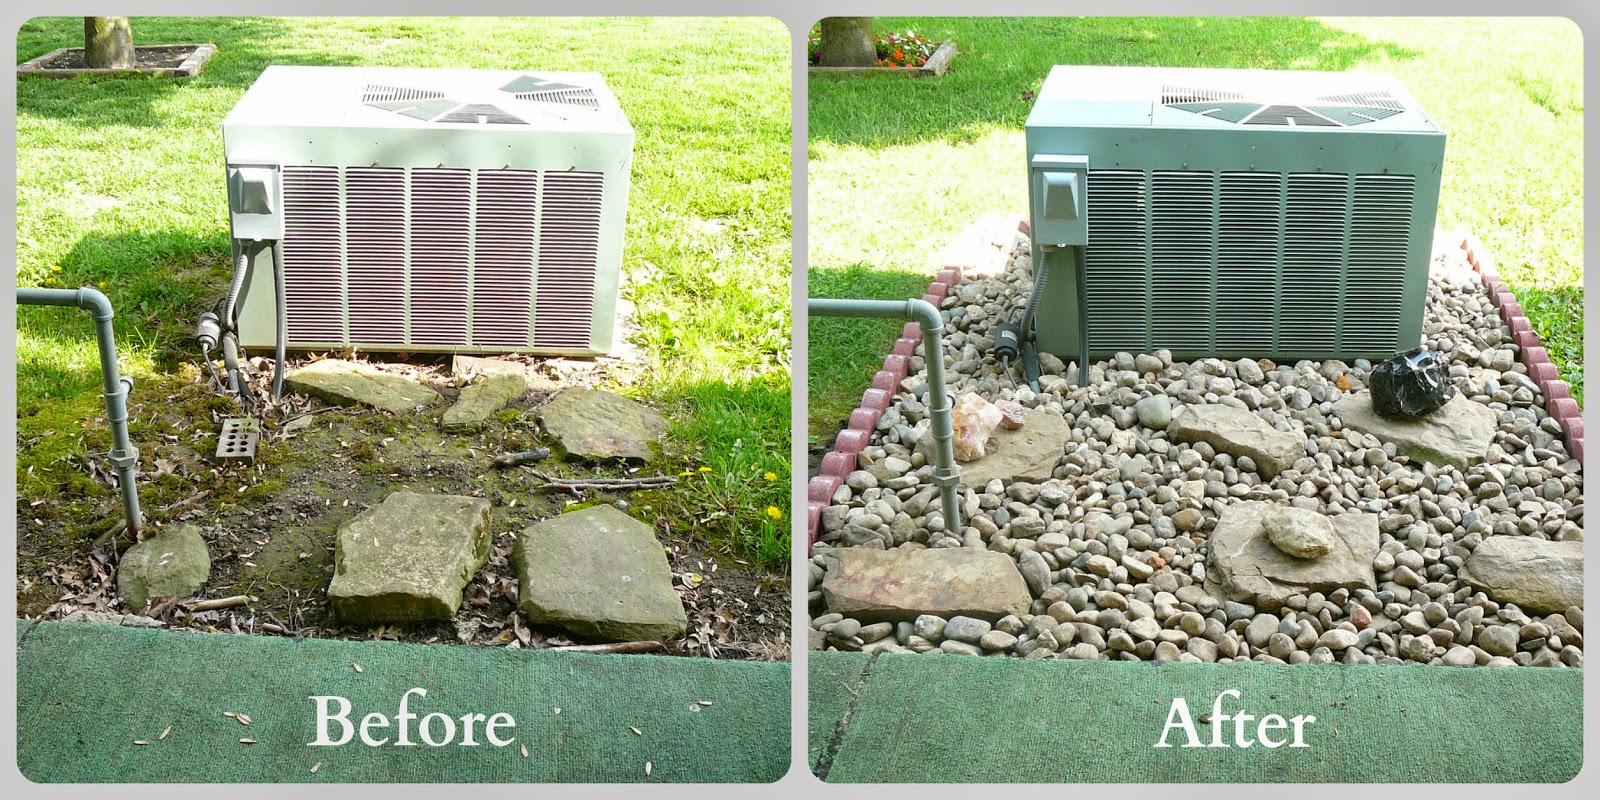
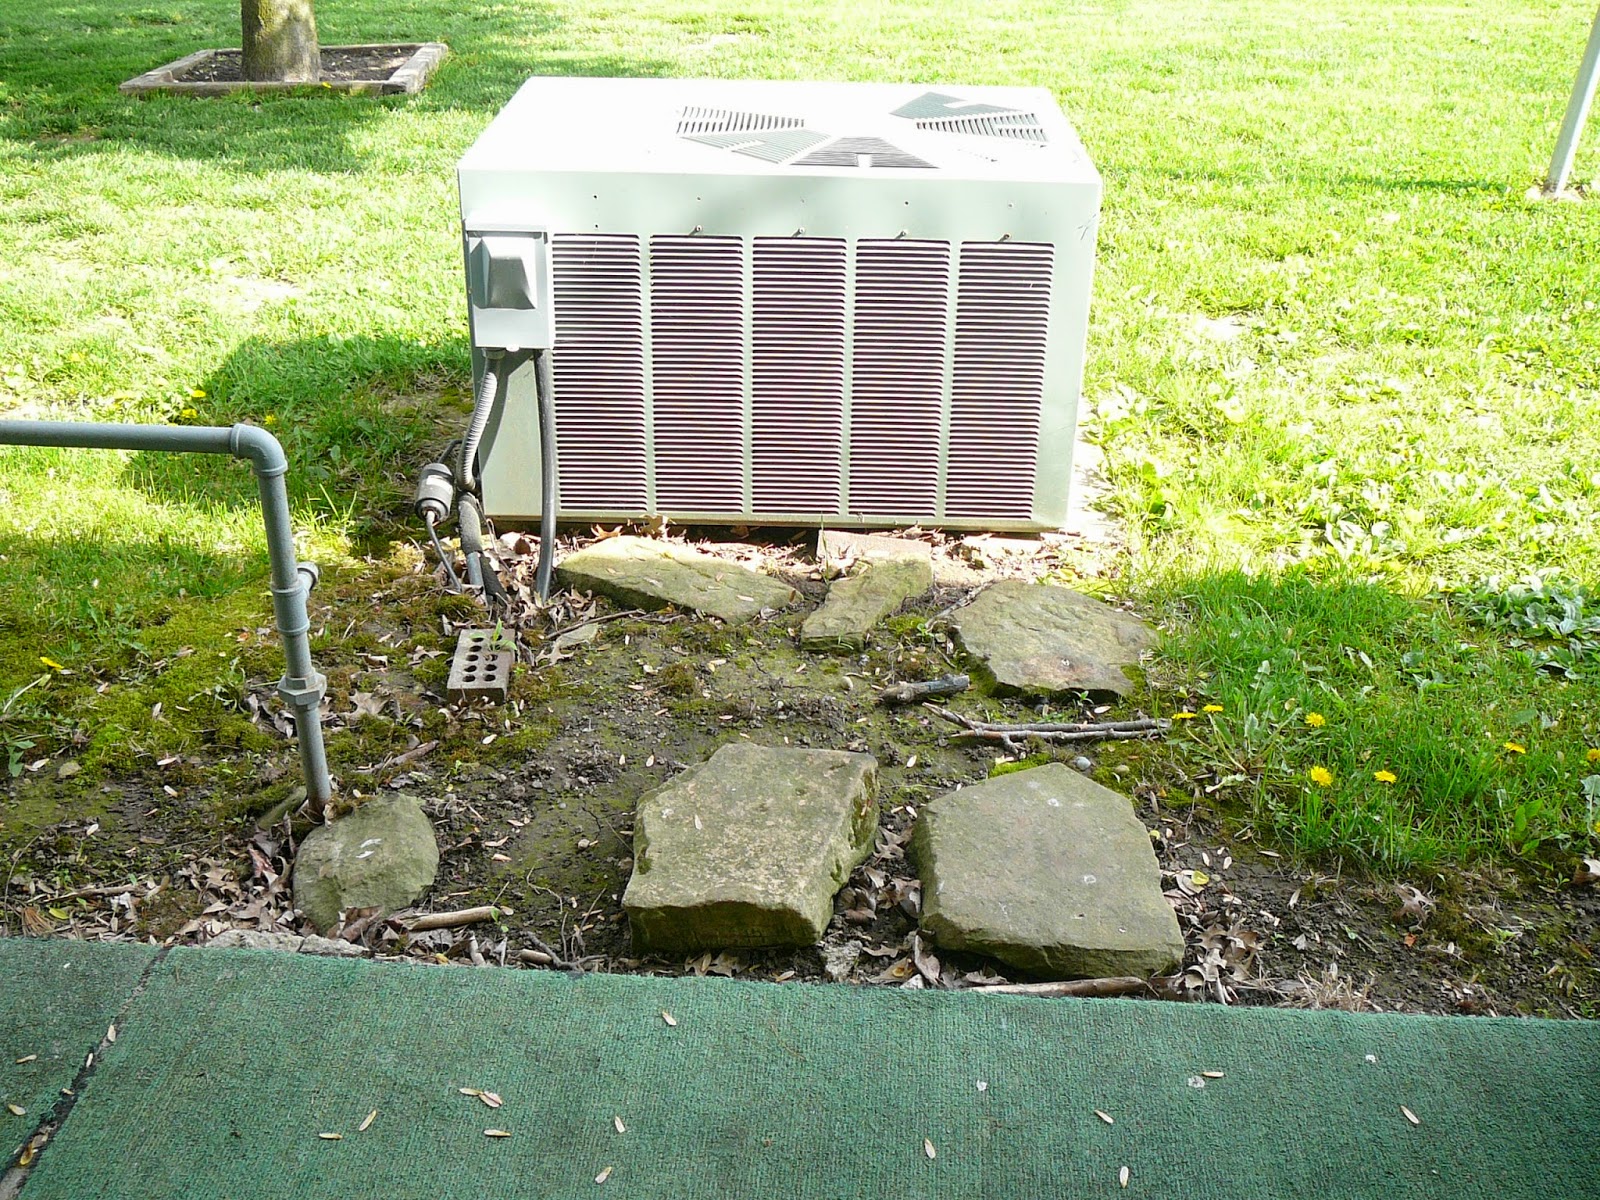
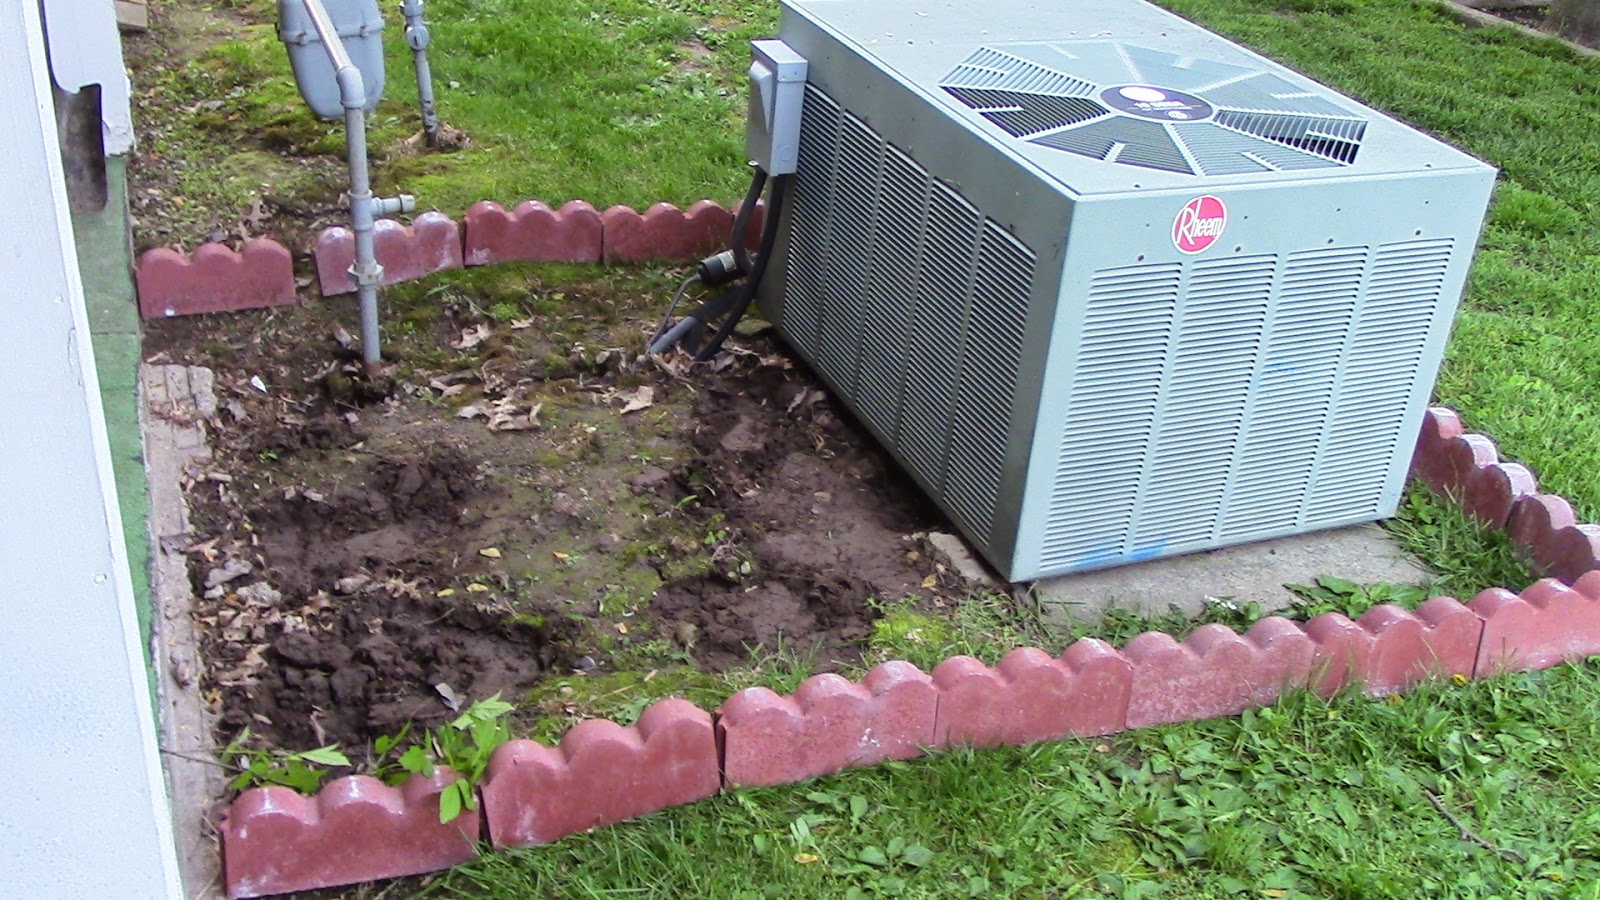
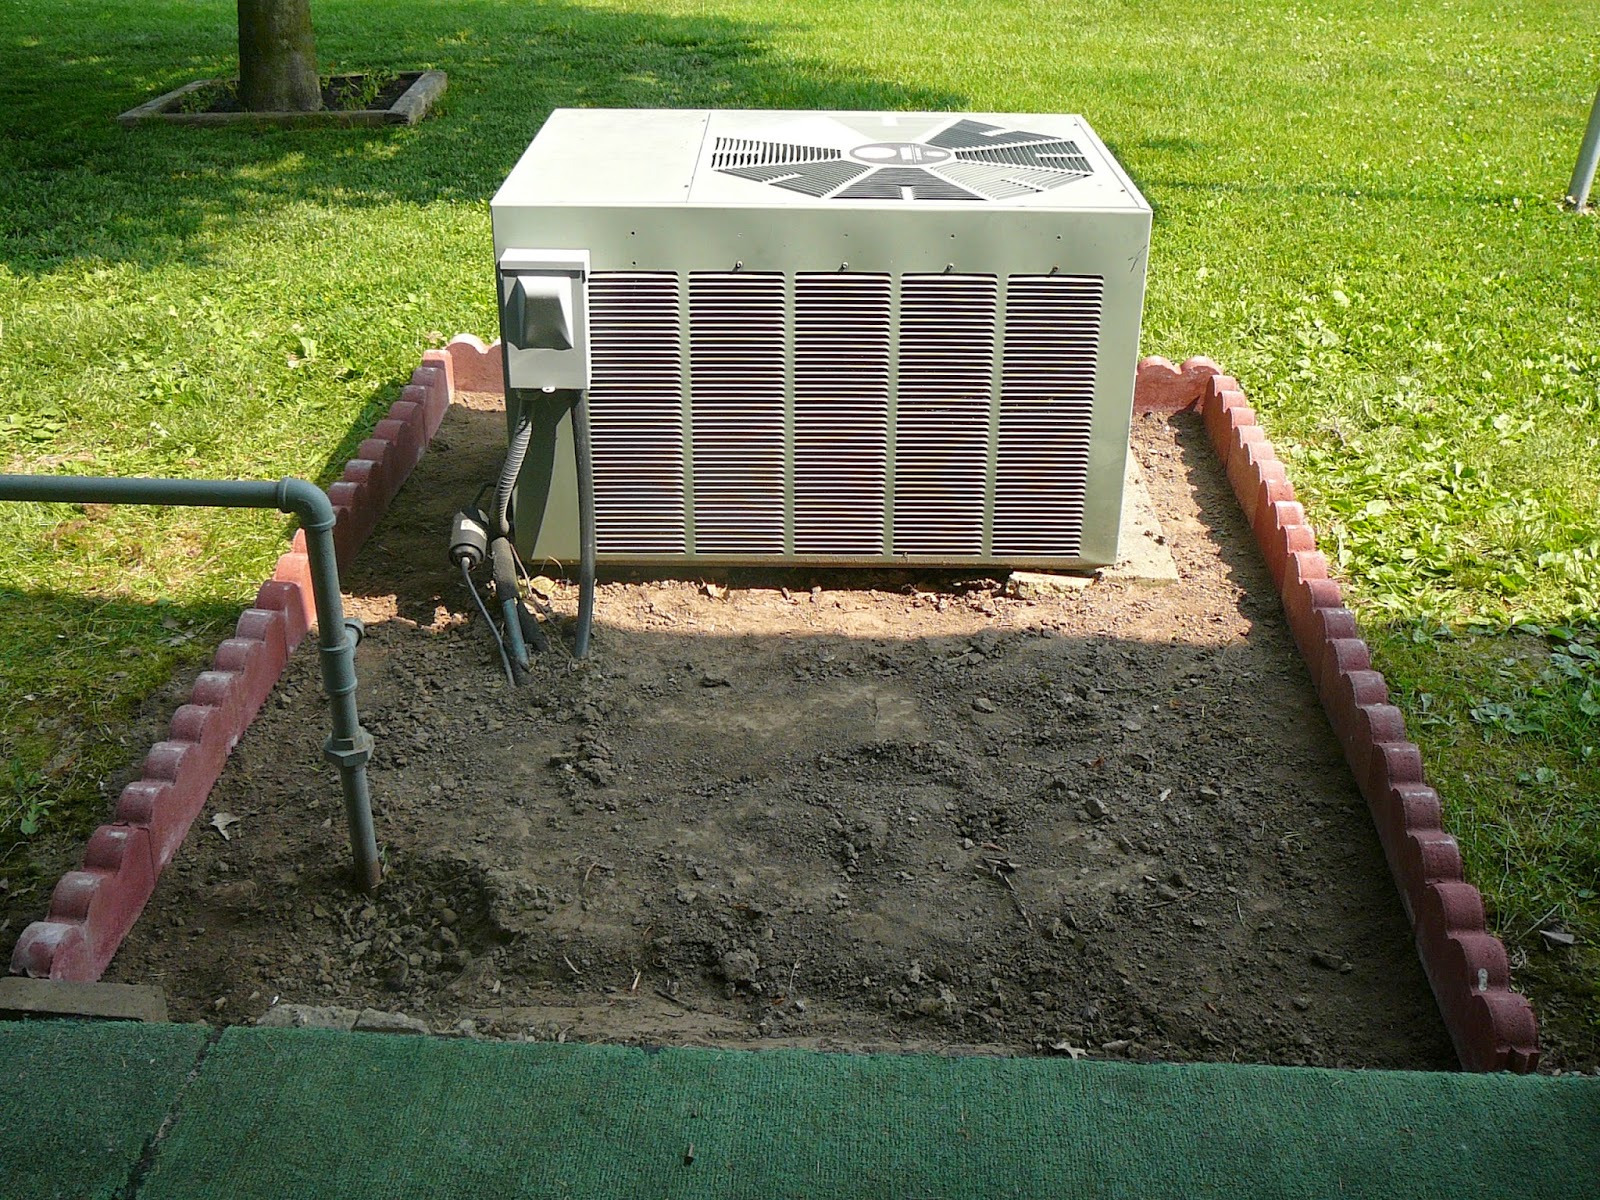
The area around our air conditioner was not in the best shape. It was bare, muddy, and mossy in various areas, and filled with twigs and other debris. So, over the Summer, David and I worked on getting the area cleaned up. We wanted to change the appearance without spending a lot of money, and without it needing a lot of upkeep. Neither of us has much time to keep a flower garden in decent shape, so we decided to use a pile of river rocks we already had in another section of our yard, and transplant them to make a rock garden. Here is the progression of our project... 

The way it was before we started working on it.

We removed the large rocks and debris,
then laid out some paving bricks where we wanted them to be.
The grass and dirt was dug out, and the pavers put in place.
 
Black weed barrier was laid down.

River rocks were transplanted and the larger rocks put back in place. We may eventually add some decorative garden ornaments or artificial flowers, but this is what it looks like for now.


Every time I look at our new rock garden, I will be reminded to put my trust in the "everlasting rock." Isn't it great that we have a God who is our refuge and strength? He is the only "rock" that can truly take care of us in our times of need. 

Psalm 18:2 - The LORD is my rock and my fortress and my deliverer, My God, my rock, in whom I take refuge; My shield and the horn of my salvation, my stronghold.

Isaiah 26:4 Trust in the LORD forever, For in GOD the LORD, [we have] an everlasting Rock. (NASB)